There are many ways to go about sharing documents with Office 365 depending on where you start from: your desktop Office 2016 software, an Office Online app, your OneDrive folder, or even your smartphone apps.
This document assumes that you are starting from Office 2016 (the desktop applications). The help documents listed in the last section cover some of the other methods.
Share an Office Document by Inviting Specific People
To share Office documents with specific colleagues using Office 2016 (your desktop applications):
- Click on the File tab
- Click Share
If the document is not already saved to OneDrive:
- Click Save to Cloud
- In the Save As screen, click on OneDrive—YorkUniversity
- Click Save

Keep in mind the when you use Save As, you are making a copy of your original document. You will still have a copy of this document in its original location!
Once the document is saved to OneDrive:
- On the File > Share screen, click Share with People. (Or click Share in the upper-right hand corner of the document window.) This will open the Share task pane.
- Click in the Invite people field and enter names or email addresses. You can enter an external email address in this field.
- Select a permission level--you can allow other people to edit or to only to view the document.
- Type a message if needed.
- Click Share.

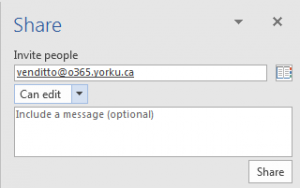
The people you shared with will receive an email with a link to the document.
If the person you invited is external to the University, they will be required to log in to a Microsoft account to access your document--they can use an existing personal or business account, or create a new personal one for free.
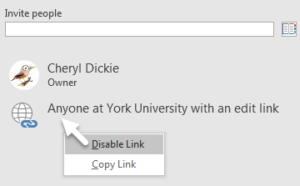
To remove someone from sharing or to change their permission level, right-click on their name in the Share task pane:

If documents have been shared with you, you can find them under File > Open > Shared with me.
Share an Office Document with a Sharing Link
For security reasons, you may only use a sharing link to share with other people at York University. To share with external colleagues, use a sharing invitation as described above.
To share Office documents using a link:
- Click on the File tab
- Click Share
If the document is not already saved to OneDrive:
- Click Save to Cloud
- In the Save As screen, click on OneDrive—YorkUniversity
- Click Save

Keep in mind that when you use Save As, you are making a copy of your original document. You will still have a copy of this document in its original location!
Once the document is saved to OneDrive:
- On the File > Share screen, click Share with People (or click Share in the upper-right hand corner of the document window). This will open the Share task pane.
- Click on Get a sharing link, a text link at the bottom of the Share task pane.
- Click on one or both buttons to create an edit link or a view-only link.
- Click the Copy button next to the link you want to share, then paste that into an email to your colleagues.


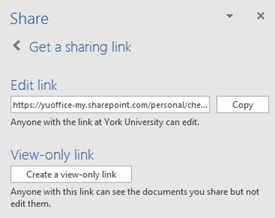
To disable existing sharing links for a file:
- Click Share in the upper-right corner of the document window to open the Share task pane.
- Right-click on the link icon and select Disable Link
The existing sharing link will be removed. You can create a new one later if you need to.
Email a file stored on OneDrive using Outlook 2016
When you email a file stored on your OneDrive, you can send each recipient their own copy of the document or send a link to the original. When you send a link, you can also choose whether to grant editing access to others at the same time.
Sending a link also allows you to circumvent email message size limits when you need to send a very large file.
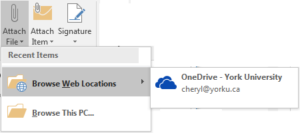
- While composing a message, click Attach File > Browse Web Locations > OneDrive – York University and then select a file from your OneDrive.
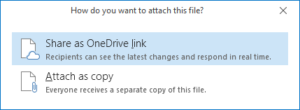
- Outlook will ask you to indicate whether you want to attach the file as a OneDrive link (shared file) or as a copy (traditional attachment).
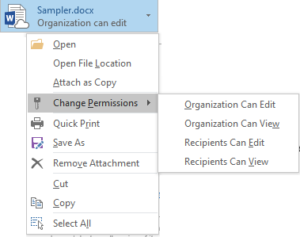
- If you’re sending a link, double-check the permissions before sending the email! The default is “Organization can edit,” meaning any York O365 user that you send this to will be able to edit the document! If needed, click on the attachment and change the permission level.
After you have shared a link using Outlook, you can locate the sharing link and disable it as described in the sections above. You can also share with more people at any time, using either Outlook or File > Share.
Learn more about how to share documents
These help articles are located on Office.com.

